Showing posts with label Blogger. Show all posts

Saturday, October 15, 2016

Tutorial to Embed a YouTube Video as Page Background in Blogger


After pasting the above coding, again in the template look for <body> open tag and just below it add this small piece of code. However, if you are unable to find <body> tag then try searching <body expr:class='&quot;loading&quot; + data:blog.mobileClass'> or similar piece of code.  <div id='wrapper-video'>  Since, we have added a open DIV id, its our job to close it properly otherwise the template would pop errors. So now search for the </body> ending tag and just above it paste this code.  </div>   Important: Do not forget to replace 61BLn00AN_w  with the ID of YouTube video, the ID are the characters that appear at the end of the URL. To provide you assistance we have attached a screenshot below. Once everything is done, Save the template.    Congratulations; You have successfully added a YouTube Video in the background of you blogger site. Go and preview your website to see if everything is working just fine.  We hope this tutorial may have helped you in learning how to add YouTube Videos in blogger. It is essentially awesome thing to be added in your blogger enabled site. Firstly makes your product attractive and second you have nothing to loose.


Some people might be wondering if there really exists a way to embed a YouTube video in the background of a Blogger blog that actually plays and works just like every other normally video embedded. Recently, one of our users asked us How to Embed a YouTube Video as page Background in Blogger? Embedding a YouTube video might turn out to be productive for a user who is selling a product, so it could be useful in attracting customer’s attention and interest. Today in this article, we will show you How to Embed a YouTube Video as page Background in Blogger.

Although, the results can be wonderful and productive but on the other hand, it has three major drawbacks. The videos cannot be paused, so if there is an ad running on the video you cannot do anything about it. It might slow down your blog, so before adding make sure you use it purposely for distinctive causes.

Before implementing, make sure you do not have a site that is fairly large in width. The maximum widget of you website content should not be more than 700px, so users can easily enjoy the video playing in the background. For additional modifications, you can make your website a bit of transparent to provide more clear video appearance.

How to Embed a YouTube Video as page Background in Blogger:

The first thing you need to do is to login into your Blogger.com account. After logging in select a blog on which you would like to install the YouTube video in the background. Now go to Template >> Edit HTML >> Search for the </head> tag and just above it paste the following code.

<script src='http://ajax.googleapis.com/ajax/libs/jquery/1.10.2/jquery.min.js' type='text/javascript'/>
<script type='text/javascript'>
//<![CDATA[
/* jQuery tubular plugin
|* by Sean McCambridge
|* http://www.seanmccambridge.com/tubular
|* Copyright 2012
|* licensed under the MIT License
|* Enjoy.
|*
|* Thanks,
|* Sean */
var videoWidth = 853;
var videoRatio = 16/9;
var defaultDiv = 'wrapper-video';
jQuery.fn.tubular = function(videoId,wrapperId) {
wrapperId = (typeof(wrapperId) == undefined) ? 'wrapper-video' : wrapperId;
t = setTimeout("resizePlayer()",1000);
jQuery('html,body').css('height','100%');
jQuery('body').prepend('<div id="yt-container" style="overflow: hidden; position: fixed; z-index: 1;"><div id="ytapiplayer">You need Flash player 8+ and JavaScript enabled to view this video.</div></div><div id="video-cover" style="position: fixed; width: 100%; height: 100%; z-index: 2;"></div>');
jQuery('#' + wrapperId).css({position: 'relative', 'z-index': 99});
var ytplayer = 0;
var pageWidth = 0;
var pageHeight = 0;
var videoHeight = videoWidth / videoRatio;
var duration;
var iframe = '<iframe id="myytplayer" width="' + videoWidth + '" height="' + videoHeight + '" src="http://www.youtube.com/embed/' + videoId + '?autoplay=1&controls=0&modestbranding=1&showinfo=0&hd=1&iv_load_policy=3&version=3&wmode=transparent&loop=1&playlist=' + videoId + '" frameborder="0" allowfullscreen></iframe>';
jQuery('#ytapiplayer').html(iframe);
jQuery(window).resize(function() {
resizePlayer();
});
return this;
}
function onYouTubePlayerReady(playerId) {
ytplayer = document.getElementById("myytplayer");
ytplayer.setPlaybackQuality('medium');
ytplayer.mute();
}
function resizePlayer() {
var newWidth = jQuery(window).width();
var newHeight = jQuery(window).height();
jQuery('#yt-container, #video-cover').width(newWidth).height(newHeight);
if (newHeight > newWidth / videoRatio) {
newWidth = newHeight * videoRatio;
}
jQuery('#myytplayer').width(newWidth).height(newWidth/videoRatio);
}
//]]>
</script>

<script type='text/javascript'>
//<![CDATA[
$().ready(function() {
$('body').tubular('61BLn00AN_w','wrapper-video');
});
//]]>
</script>

After pasting the above coding, again in the template look for <body> open tag and just below it add this small piece of code. However, if you are unable to find <body> tag then try searching <body expr:class='&quot;loading&quot; + data:blog.mobileClass'> or similar piece of code.

<div id='wrapper-video'>

Since, we have added a open DIV id, its our job to close it properly otherwise the template would pop errors. So now search for the </body> ending tag and just above it paste this code.

</div> 

Important: Do not forget to replace 61BLn00AN_w  with the ID of YouTube video, the ID are the characters that appear at the end of the URL. To provide you assistance we have attached a screenshot below. Once everything is done, Save the template.


Congratulations; You have successfully added a YouTube Video in the background of you blogger site. Go and preview your website to see if everything is working just fine.

We hope this tutorial may have helped you in learning how to add YouTube Videos in blogger. It is essentially awesome thing to be added in your blogger enabled site. Firstly makes your product attractive and second you have nothing to loose.

Wednesday, October 12, 2016

Add Advance Polls and Surveys in Blogger Posts


Probably, the most prominent way to engage your visitors on your site is to do one-on-one interaction with them. Adding Polls and surveys is a different way to magnetize the attention of the visitors towards your blog. Polls also help you to get into the depth of your visitors and allow you to know the insights of your users. Furthermore, you can also use polls to ask your readers a question or what they want to see on your site. In this situation, nothing could beat a poll. In this article, we will show you How to Add Advance Polls and Surveys in Blogger Using Toluna.

First, you need to sign up for an account at http://www.toluna.com It has a modest Registration form partly consists of Your Name, Password, Email and Gender. Just fill the registration form correctly and hit the Sign Up button. (Alternative: If you are a Facebook User then, you can use FB Connect button for ultra-fast registration).

Add Advance Polls and Surveys in Blogger Posts
After verifying your email address, just sign in to your account. Once everything is done, it is time to create your first Poll. Just go to http://us.toluna.com/Recent/?create  and you will be able to see a screen similar to the following screenshot. There would be four different options i.e. Poll, Topics, Thumbs and VS Battle out of which you have to select “POLL”. On selecting “Poll”, you would be able to witness a number of options which we have discussed below.
Add Advance Polls and Surveys in Blogger Posts
Ask Something: In this Area, you will write the question which you are willing to ask from your readers.
Write an Answer: Now, you have to provide a few numbers of options to users so they can select the answer on the basis of the answers that you provided in the survey  (This would act as a survey because your users only have to (Tick) the answer according to their interests. 
Category: Select a category of your survey entirely depends on your question.
Once everything is done, select the “Create” button present at the right side of your screen and your survey would be published publicly.

After creating your survey, now you need to find the embed code to add it on your site. In order to get the Embed code, open the survey that you created a few moments a go. You can access the list of your surveys through "My Polls" options appearing at the right side of your screen. 
Now select the plus sign button appearing at the bottom of your screen as shown in the screenshot below. 
Add Advance Polls and Surveys in Blogger Posts
After copying the code go to Blogger.com >> Create a new Post >> Select HTML Tab and paste the code where you would like to see the poll or survey to appear. Now publish your article, and that’s it.

There are many other methods to add polls in your Blogger website some easier than others. How we can forget the default survey widget but, the default widget is outdated and looks dirty too. What is your favorite method of adding polls and surveys in your Blogger website?

Monday, October 10, 2016

Tutorial to Add Emotions to blogger Comments


Due to increase in the use of social media platform people have a habit of using funny Smileys along with their comments. Recently, one of our user asked us that how to add chat emoticons in blogger comments? Today in this article, we will show you how to add chat emoticons in blogger comments.

Why to Add Chat Emoticon in Blogger?

Action speaks louder than words. Similarly, chat emotions are a way to show your mood. Whenever a user leaves a comment on your site, you don’t have any idea about how he is feeling. However, if the same comment has a Angry, happy, or confused emotion image then you can easily understand that mood of the commenter. This is the reason why, a lot of commenting systems are adding emotions to there platform. And the same thing can be added to Blogger custom commenting system as well.

How to Add Chat Emoticons in Blogger?

First of all, Sign in to Blogger and then select your Blog.

After that, you need to Click on Template From left bar and then Click on Edit HTML.

Now, Press Ctrl+F and then you’ll have search bar and then search for </body> tag using that search bar.  Ones you found the </body> tag, then paste the following code above it.

<script src='https://78f4de3676ac34c79dbc2146065980a0e371905b.googledrive.com/host/0B6AQ0cwAMPNQfnZBck56QnZHT0pSbFY1dmtWcFFwUjJWVlNMMFg3ZW1QSmJFT2l3RmVtTXc/js/netoops-whatapp-smileys-blogger-posts-comments.min.js'/><script type='text/javascript'>//bloggersmileys.init();</script>

That it, after adding the above link emoticons can be used in comments. However, if you want to display emoticons short codes to help users to use them efficiently in their comments, then continue following the tutorial.

Again in the Template, search for <div class='post-footer-line post-footer-line-3'> then look for </b:includable> tag and just above it paste the following script.

<b:if cond='data:blog.pageType == &quot;item&quot;'>
<div class='noopsmile' id='noopsmile' style='background-color:#E0F7FF;background:#eee; border-radius: 7px;width:634px; padding:10px; border:1px solid #ddd'><img src='https://78f4de3676ac34c79dbc2146065980a0e371905b.googledrive.com/host/0B6AQ0cwAMPNQfnZBck56QnZHT0pSbFY1dmtWcFFwUjJWVlNMMFg3ZW1QSmJFT2l3RmVtTXc/imgs/comment-section1.png'/><a style='display:none;' href='www.netoopsblog.com' >bloggerwidgets</a><div align='right' id='close' style='font: bold 13px arial;margin-top: -14px; cursor: pointer;'> Close [x] </div></div><div id='open' style='background-color:#eee; border-radius: 7px; padding:10px;width: 87px;cursor: pointer;display:none;left: 582px;position: fixed;top: 1%;z-index:999;font-weight:bold;'> Open Emoticions</div></b:if>
After that, you need to add the CSS coding of Smileys in order to make them look as appealing as Whatsapp, facebook or any other popular social platform. Search for ]]></b:skin> tag and paste the following code above it.

.post-body img.noops-smly {
  padding: 0 !important;
  margin-top: -2px !important;
}

Afterwards, simply hit the Save Template button and start using those awesome smileys on your blog.

We hope this article have helped you in learning how to add chat emotions in blogger comments. We are sure it would have been proven helpful for you. If you are facing any difficulty while applying this, then lend your queries in the comment box. Any of our team members will get back to your queries.

How to Hide Author Name and Labels from Blogger Posts


Whenever you post any article on blogger, it automatically shows up author name along with labels under the post titles. or at the very end of your post depending upon your blogger template. We have seen many newbies who want to hide author name to protect their privacy and even labels from their blogger post to make their blog look more professional. Today in this article, we will show you how to hide author name and labels from blogger posts.

How to Hide Author Name and Labels from Blogger Posts

So, here are the steps which you need to follow, so that you can easily hide the author name and labels from Blogger posts. We have divided this article into two sections so that you can easily grasp the idea and method.

To hide author names from your Blogger posts, just follow the below instructions correctly:


  1. First of all, go to Blogger and select your blog.
  2. Now click on Template from sidebar and then Click on Edit HTML.
  3. After that, press Ctrl+F and search for <data:post.author/>
  4. Ones you found it, then simply remove it. 
  5. You will have this code more than one time in your blogger template so simply remove it from everywhere. 
  6. Save your blogger template and now you will never see any author name in your Blogger posts. 
Hide Labels from Blogger Posts

To hide labels from your Blogger posts, just follow the below instructions correctly:

  1. First of all, go to Blogger and select your blog.
  2. Now click on Template from sidebar and then Click on Edit HTML.
  3. After that, press Ctrl+F and search for the ending </head> tag.
  4. Ones you found </head> tag then simply paste the following code above the ending </head> tag.<style>.post-labels {display: none;}</style>
  5. Save your blogger template and it will hide labels from your Blogger posts.
  6. This was our article which has made you learn to hide author name and labels from blogger posts. We are sure you guys must have availed from this article. If you have any queries or confusions left related to this article then lend them in comment box. Any of our team members will assist you in solving them.

Wasit interesting? If it was then don’t forget to share this article with your other friends and circle too. You may never know that your share may be proven helpful for many of the users out there. So, keep sharing and liking our content over social media. 

Tuesday, September 27, 2016

Method to Display a Weather Forecast on Your Blogger

Method to Display a Weather Forecast on Your Blogger

Before anyone use this widget, we will be giving some significant reasons why you should use it too, mainly discussing about its function. Let’s assume a visitor from London, England landed on your site. Now this widget would fetch the data from local weather company and would provide its details accurate. Now if the day is sunny, rainy, cloudy and etc.

Process to add weather in blogger: 

The first thing you need to do is to login into your blogger dashboard. Now go to Template >> Edit HTML >> and search for the skin tag, just above it paste the following piece of CSS coding (you can customize the code if you like, but we are certain that the default one would just be right for everyone).

MyWeatherDiv .centerContainer {
    width: 300px;
    text-align: left;
    margin-bottom: 200px;
}
.green {
    color: #a6e22d;
}
.teal {
    color: #66d9ef;
}
.purp {
    color: #ae81ff;
}
.pink {
    color: #f92772;
}
.yellow {
    color: #e6db74;
}
.white {
    color: #f8f8f2;
}
.grey {
    color: #616161;
}
.f12 {
    font-size: 12px;
}
.MyWeatherDiv img {
    height: 64px;
    width: 64px;
}
.weatherInfoRight {
    z-index: 999;
    position: fixed;
    top: 10px;
    right: 10px;
}
.weatherInfoLeft {
    z-index: 999;
    position: fixed;
    top: 10px;
    left: 10px;
}
.weatherInfoBottomRight {
    z-index: 999;
    position: fixed;
    bottom: 10px;
    right: 10px;
}
.weatherInfoBottomLeft {
    z-index: 999;
    position: fixed;
    bottom: 10px;
    left: 10px;
}
.MyWeatherDiv {
    display: none;
    background-color: #272822;
    padding: 5px;
    -webkit-border-radius: 10px;
    border-radius: 10px;
}
.MyWeatherInfo {
    text-align: center;
    font-family: 'Segoe UI',Tahoma,Helvetica,Sans-Serif;
    color: white;
    font-size: 14px;
}
#divMyImage {
    display: none;
}
.MyWeatherClose {
    font-family: 'Segoe UI',Tahoma,Helvetica,Sans-Serif;
    cursor: pointer;
    position: absolute;
    right: 10px;
    color: white;
    font-size: 20px;
}
.MWTemperature {
    display: block;
}
.MWPlace {
    display: block;
}
.MWIP {
    display: block;
}
#clear-day {
    display: none;
}
#clear-night {
    display: none;
}
#partly-cloudy-day {
    display: none;
}
#partly-cloudy-night {
    display: none;
}
#cloudy {
    display: none;
}
#rain {
    display: none;
}
#sleet {
    display: none;
}
#snow {
    display: none;
}
#wind {
    display: none;
}
#fog {
    display: none;
}

The second thing is to add the JavaScript file that does the work quite brilliantly. Within your blogger template search for the </head> tag and just above it paste the following JS Coding. (We recommend you to please host the script on your own either on Google Drive or any other service because our script might go down if our quota of bandwidth gets full).

<script type="text/javascript" src="https://dl.dropboxusercontent.com/u/137869302/weather.js"></script>

Lastly, add this styling javascript file just above the </body> tag. You can change the position of the gadget by replacing  position: "right" to left or center. There are many other options for your customization, which could be useful to match your site’s setting.

<script type="text/javascript">
$.MyWeather({
    position: "right",
    showpopup: true,
    temperature: "c",
    closeicon: true,
    showicon: true,
    showtemperature: true,
    showlocation: true,
    showip: true,
    size: 80,
    iconcolor: "white",
    fontcolor: "white",
}, function (e, f, g, a, d, b, c) {
    $("#txtCity").html(e);
    $("#txtCountry").html(f);
    $("#txtIP").html(g);
    $("#txtLatitude").html(a);
    $("#txtLongitude").html(d);
    $("#txtTemperature").html(b);
    $("#picTemp").attr("src", c)
});
</script>

We hope this tutorial may have helped you in learning How to display weather forecast on Your Blogger site. Do give it a try, and let us know what are your thoughts about our latest development by commenting your opinions below.

Method to Display Most Commented Posts in Blogger


Method to Display Most Commented Posts in Blogger

People often ask us a common question, how they can showcase a list of most commented posts in the sidebar of their blog. Showing a list of the content that is most discussed is indeed a great way to encouraging new users to join in the conversation. It also benefits in building an active community that means more engagement and more readers would be jumping into your website. In this article, we will demonstrate that how to display most commented posts in blogger?


The very first thing you need to do is to login to your blogger account with the help of your Gmail ID and password. Once you are successfully entered to Blogger Dashboard, go to Layout >> Sidebar >> Add a gadget >> Add HTML/JavaScript and in the HTML Text box paste the following piece of code:

<!-- Popular posts with comment count Start -->
<script type="text/javascript">
function getYpipePP(feed) {
 document.write('<ol style="">');
 var i;
 for (i = 0; i < feed.count ; i++)
 {
var href = "'" + feed.value.items[i].link + "'";
var pTitle = feed.value.items[i].title;
var pComment = " \(" + feed.value.items[i].commentcount + "\)";
var pList = "<li>" + "<a href="+ href + '" target="_blank">' + pTitle;
 document.write(pList);
 document.write(pComment); //to remove comment count delete this line
 document.write('</a></li>');
 }
 document.write('</ol>');
 }
 </script>
 <script src="http://pipes.yahoo.com/pipes/pipe.run?
 YourBlogUrl=http://www.brainfy.blogspot.com/
 &ShowHowMany=10
 &_id=390e906036f48772b2ed4b5d837af4cd
 &_callback=getYpipePP
 &_render=json"
type="text/javascript"></script>
<span style="font-size: 80%; float:right;"><a href="http://www.brainfy.blogspot.com/2014/06/how-to-display-most-commented-posts-in-blogger.html">Make your own</a></span>
<!-- Popular posts with comment count End -->

After pasting the above code, you need to customize it to your desire needs, so do not forget to replace http://www.brainfy.blogspot.com with your blog URL. By default, it would display 10 most commented posts so to increase or decrease the count replace =10 with the number of posts you would like to display.

Once you have finished customizing the gadget, press the “Save” button to enable the gadget in the sidebar of your blog. Congratulations, you have successfully added a list of most commented posts in your blogger blog.

We hope this article have helped all those people who kept on messaging us about this gadget. Do let us know what are your feelings and thoughts about it. In case you are already using it then let us know about how it has helped you to engage more audience. If you found this article useful, then please return back by subscribing us at Google+, Facebook or Twitter.

How to Add Whatsapp Share Button in Blogger

 How to Add Whatsapp Share Button in Blogger

Blogger gives you the opportunity to promote your content via many social networks. Back in year 2009, when WhatsApp was launched, no one knew that it would challenge the graph of Facebook. In the year 2013, WhatsApp was declared as the most used social network, leaving Facebook behind. Today in this article, we will show you how to add whatsapp share button in blogger.


What Should You Add Whatsapp Share Button:

With the increased use of mobile phones by each passing day, it is necessary for you to make the best use of your phone by optimizing it and enabling it so share sites, writing content or anything you liked and want to share with your friends as well.

In the beginning WhatsApp was only a mobile feature but its increasing fame led to its availability on web as well. Now, just think about how beneficial it would be for you if one of your subscribers like any article on your blog and he shared it via WhatsApp, more the people view his shared article, more your website traffic will boost.


How to Add Whatsapp Share button in Blogger:

Before adding WhatsApp share button to blogger, first we will discuss its position. It is recommended to add such traffic boosting widgets at the end of your article instead of putting them to the side bar running along the entire length of your blog.

You can add WhatsApp share button with the help of following method:


Move your mouse pointer and go to Template >> Edit HTML. Look for your old share buttons. Add the following code with you previous share buttons. BE KEEN WITH THE CODES!

<!-- Whatsapp Share Buttons Start -->
<script type='text/javascript'>if(typeof wabtn4fg===&quot;undefined&quot;){wabtn4fg=1;h=document.head||document.getElementsByTagName(&quot;head&quot;)[0],s=document.createElement(&quot;script&quot;);s.type=&quot;text/javascript&quot;;s.src=&quot;https://dl.dropboxusercontent.com/u/7330191/whatsapp-sharing.js&quot;;h.appendChild(s);}</script>
<a class='wa_btn wa_btn_s' expr:data-href='data:post.url' expr:data-text='data:post.title' href='whatsapp://send' style='display:none'>Share</a>
<!-- Whatsapp Share Buttons End -->

Preview your template and then save it.

Once above all steps are executed successfully it means that you are successful in execution of the task assigned. Now you could preview the blog and need to save the changes to the template by pressing the orange “Save template” button.


How to Add Skype Share Button in Blogger

How to Add Skype Share Button in Blogger
You must have already used many social share buttons from major social networking brands like Facebook, Twitter, Google+, WhatsApp, etc. As the name suggests, share button makes it easier for you to share the content with your friends online on your social profile.  Skype the Microsoft owned company also has its own share button as well that allows you to send the content to your love ones, strength to their Skype chat.  Today in this article, we will show you how to add a Skype Share button in Blogger.

Why to Add Skype Share Button?

With the increase in the use of social networking websites, almost all web owners are looking to find different ways to drive traffic from social sites.
How to Add Skype Share Button in Blogger
Skype has about 30 million active users, having a Skype share button on your site provides you the opportunity that your content can be shared with millions of more users.

Having a Skype button could play a significant role is making your content go viral. There is always a 50% chance you might get some traffic, so why don’t you give it try?

How to add Skype Share Button?

To add Skype share button on your blogger site take a look at the following instructions.
The very first thing you need to do is to install the Skype share button script which will make the button function. So, go to Blogger >> Template >> Edit HTML >> and look for the </head> tag. Now, after finding the </head> tag, paste the following JavaScript code just above it:
<script>
// Place this code in the head section of your HTML file
(function(r, d, s) {
 r.loadSkypeWebSdkAsync = r.loadSkypeWebSdkAsync || function(p) {
  var js, sjs = d.getElementsByTagName(s)[0];
  if (d.getElementById(p.id)) { return; }
  js = d.createElement(s);
  js.id = p.id;
  js.src = p.scriptToLoad;
  js.onload = p.callback
  sjs.parentNode.insertBefore(js, sjs);
 };
 var p = {
  scriptToLoad: 'https://swx.cdn.skype.com/shared/v/latest/skypewebsdk.js',
  id: 'skype_web_sdk'
 };
 r.loadSkypeWebSdkAsync(p);
})(window, document, 'script');
</script>

Once everything is done, just save the Template.

Now paste the following code anywhere in your template where you want the share button to appear. In order to add share button in the sidebar go to Blogger >> Layout >> Add a gadget >> Add HTML/JavaScript and paste the code in the HTML text box.

<div class='skype-share' data-href='' data-lang='' data-text='' data-style='small' ></div>
You can change the size of the Share button following are the codes for different style and sized buttons:

Style Type Source Code
Small <div class='skype-share' data-href='' data-lang='' data-text='' data-style='small' ></div>
Circle Icon <div class='skype-share' data-href='' data-lang='' data-text='' data-style='circle' ></div>
Large <div class='skype-share' data-href='' data-lang='' data-text='' data-style='large' ></div>
Square <div class='skype-share' data-href='' data-lang='' data-text='' data-style='square' ></div>

When users will click the share button, it will ask them to sign in with their Skype ID, after logging in users will able to share your content with their friends on Skype.

We hope this article has helped you in learned how to add a Skype share button in Blogger. Though, it is still unclear whether users will choose Skype to share content but still its not a bad choice to give it a try. Let us know what do you think about it in the comments below.

How to Add Smooth Mouse Wheel Scrolling Effect in Blogger

How to Add Smooth Mouse Wheel Scrolling Effect in Blogger


Have you seen websites that add a smooth mouse wheel scroll effect? This is a great way to make the scroll movement smooth as it gives your users a better scrolling experience while reading long content. Recently, one of our users asked us about adding a smooth mouse wheel scroll effect in blogger. In this article, we will show you how to add smooth mouse wheel scroll effect in blogger.

Smooth mouse wheel scrolling effect makes your site easier to navigate. It adds vertical scrolling on your site allowing you to smoothly scroll up/down the webpage using mouse wheel

The very first thing you need to do is to go to Blogger >> Template >> Edit HTML, now in the template search for the </head> tag. After finding the </head> tag, just above it paste the following code.
<script type='text/javascript'>
/*<![CDATA[*/
/**
 *Smooth Scroll Mouse Wheel By Mybloggerlab.com
 */
(function() {
this.GambitSmoothScroll = function( settings ){
 if ( typeof settings === 'undefined' ) {
  settings = {};
 }
 var defaults = {
  'amount': 150,
  'speed': 900
 };
  for ( var key in defaults ) {
  if ( ! settings.hasOwnProperty( key ) ) {
   settings[ key ] = defaults[ key ];
  }
 }
 // Disable in mobile because we don't need smooth scrolling there
 if ( navigator.userAgent.match(/Mobi/)) {
  return;
 }
  this.settings = settings;
 this.startedAsTrackpad = false;
 this.start();
};

/**
 * Start our plugin
 */
GambitSmoothScroll.prototype.start = function() {
 document.addEventListener('DOMContentLoaded', function() {
  window.addEventListener( 'wheel', this.overrideScroll.bind(this) );
   }.bind(this));
};

/**
 * Stops the current scroll
 */
GambitSmoothScroll.prototype.stop = function( isDown, timestamp ) {
 if ( typeof this.scrollInterval !== 'undefined' ) {
  this.startedAsTrackpad = false;
  clearInterval( this.scrollInterval );
  this.scrollInterval = undefined;
 }
};

/**
 * Performs the smooth page scroll
 */
GambitSmoothScroll.prototype.newScroll = function( isDown, timestamp ) {
  // If the scroll went the opposite way, reset the scroll as if from full stop
 if ( isDown !== this.isDown && typeof this.isDown !== 'undefined' ) {
  this.stop();
 }
 this.isDown = isDown;
  // If called to scroll from a full stop, create our scroller loop
 if ( typeof this.scrollInterval === 'undefined' ) {
    this.startingSpeed = this.settings.amount;
  this.scrollInterval = setInterval( function() {
      // Perform the scroll
   var scrollBy = ( this.isDown ? 1 : -1 ) * this.startingSpeed / 15;
   window.scrollBy( 0, scrollBy );
   // Stop the scroller when the scroll becomes too small
   this.startingSpeed *= 1 - ( 900 / this.settings.speed ) / 10; // 0.9;
   if ( Math.abs( scrollBy ) < 1 ) {
    this.stop();
   }
  }.bind(this), 16.666666667 ); // 60fps
   // If called while the page is still scrolling, add more momentum to the current scroll
 } else {
  // Base the momentum multiplier on the delta time to avoid super fast scrolls
  var multiplier = 1 + ( timestamp - this.prevTimestamp ) / 40 * 0.7;
    // Limit the amount
  this.startingSpeed = Math.max( this.startingSpeed * multiplier, this.settings.amount );
  this.startingSpeed = Math.min( this.startingSpeed, 300 );
 }
 this.prevTimestamp = timestamp;
};

/**
 * Stops the default scroll behavior and does our own thing
 */
GambitSmoothScroll.prototype.overrideScroll = function(e) {
  // Normalize wheel delta scroll
 var delta = e.wheelDelta ? -e.wheelDelta / 120 : (e.detail || e.deltaY) / 3;
  /**
  * Basically, when we check the delta variable, trackpads give out a value of < 1 && < -1
  * mouse wheel scrolls give out a value >= 1 || <= -1
  * We can use this to turn OFF smooth scrolling for trackpads.
  *
  * IMPORTANT: Firefox in Mac somehow handles things differently.
  * the skipCheck variable handles things for FF in Macs
  */
  // Special for Firefox-Mac
 var skipCheck = false;
 if ( typeof window.mozInnerScreenX !== 'undefined' ) {
  if ( navigator.platform.indexOf( 'Mac' ) !== -1 ) {
   this.startedAsTrackpad = false;
   skipCheck = true;
   if ( e.deltaY === parseInt( e.deltaY, 10 ) ) {
    this.startedAsTrackpad = true;
    return;
   }
  }
 }
 if ( typeof this.trackpadTimeout !== 'undefined' ) {
  clearTimeout( this.trackpadTimeout );
  this.trackpadTimeout = undefined;
 }
  // If delta is less than 1, assume that we are using a trackpad and do the normal behavior
 if ( ( Math.abs( delta ) < 1 || this.startedAsTrackpad ) && ! skipCheck ) {
    this.trackpadTimeout = setTimeout( function() {
   this.startedAsTrackpad = false;
   this.trackpadTimeout = undefined;
  }.bind(this), 200 );
    this.startedAsTrackpad = true;
  return true;
 }
  // If the code reaches here, then scrolling will be smoothened
 // Disable normal scrolling
 e = e || window.event;
 
Now again in the template, search for </body> and just above it paste the following code.
<script type="text/javascript">
new GambitSmoothScroll({
    amount: 150, // The scroll amount
    speed: 900 // The scroll speed
});
</script>
Note: Make sure your blogger template has jquery.min.js or jquery.js file. In case you are unable to find this file on your blogger template then add it manually. Add the following code below the <head> tag.
<script src='http://ajax.googleapis.com/ajax/libs/jquery/1.7.2/jquery.js' type='text/javascript'></script>
Once everything is done, save the template by pressing “Save Template” button and you have successfully added a cool smooth mouse wheel scroll effect in blogger.

We hope this tutorial has turn out to be useful for those who were looking to add a smooth parallax mouse wheel scroll using jQuery on to their websites. If you have a better way of doing this job then feel free to leave a comment below. If you like this article, share it on Facebook, Twitter or Google+.

How to Add an HTML Sitemap Page in Blogger


How to Add an HTML Sitemap Page in Blogger

XML Sitemaps vs HTML Sitemaps

An XML created with the help of an XML markup language and are especially intended for search engines. You can create and submit your site's XML sitemap in webmaster tools, which will not only improve your site's crawling rate but also quick indexation of your site.
sitemap

On the other hand, HTML sitemaps are created with plain Hyperlink Text Markup Language and are especially intended for your website visitors. It is usually used to list all the post or pages that are published on your site.

You can check the demo of this widget here.

Adding an HTML Sitemap With All Posts in Blogger:

To add a HTML sitemap in blogger please follow the below instructions correctly:
    • The very first thing you need to do is to  add the CSS codes so you can make your sitemap look attractive. Go to Blogger >> Template >> Edit HTML >> Search for ]]></b:skin> tag and just above it paste the following code. You can also customize the below codes to match your style of template color scheme:
    /* Sitemap plugin By Brainfy */
    #bp_toc {
        color: #666;
        margin: 0 auto;
        padding: 0;
        border: 1px solid #d2d2d2;
        float: left;
        width: 100%;
    }
    span.toc-note {
        display: none;
    }
    #bp_toc tr:nth-child(2n) {
        background: #f5f5f5;
    }
    td.toc-entry-col1 a {
        font-weight: bold;
        font-size: 14px;
    }
    .toc-header-col1,
    .toc-header-col2,
    .toc-header-col3  {
    background:#9E9E9E;
    }
    .toc-header-col1 {
        padding: 10px;
        width: 250px;
    }
    .toc-header-col2 {
        padding: 10px;
        width: 75px;
    }
    .toc-header-col3 {
        padding: 10px;
        width: 125px;
    }
    .toc-header-col1 a:link,
    .toc-header-col1 a:visited,
    .toc-header-col2 a:link,
    .toc-header-col2 a:visited,
    .toc-header-col3 a:link,
    .toc-header-col3 a:visited {
        font-size: 13px;
        text-decoration: none;
        color: #fff;
        font-weight: 700;
        letter-spacing: 0.5px;
    }
    .toc-header-col1 a:hover,
    .toc-header-col2 a:hover,
    .toc-header-col3 a:hover {
        text-decoration: none;
    }
    .toc-entry-col1,
    .toc-entry-col2,
    .toc-entry-col3 {
        padding: 5px;
        padding-left: 5px;
        font-size: 12px;
    }
    .toc-entry-col1 a,
    .toc-entry-col2 a,
    .toc-entry-col3 a {
        color: #666;
        font-size: 13px;
        text-decoration: none
    }
    .toc-entry-col1 a:hover,
    .toc-entry-col2 a:hover,
    .toc-entry-col3 a:hover {
        text-decoration:underline;
    }
    #bp_toc table {
        width: 100%;
        margin: 0 auto;
        counter-reset: rowNumber;
    }
    .toc-entry-col1 {
        counter-increment: rowNumber;
    }
    #bp_toc table tr td.toc-entry-col1:first-child::before {
        content: counter(rowNumber);
        min-width: 1em;
           min-height: 3em;
        float: left;
        border-right: 1px solid #fff;
        text-align: center;
        padding: 0px 11px 1px 6px;
        margin-right: 15px;
    }
    td.toc-entry-col2 {
        text-align: center;
    }
    • Once everything is done, press Save Template button present at the very top of your screen.
    • Now Simply create a new page where you want to display your sitemap. Go to Blogger >> Pages >> New page. In the Blogger page editor, select HTML tab and paste the following code in the HTML code editor:
    <div id="bp_toc">
    </div>
    <script src='http://mybloggerlab.com/js/sitemap.js'  type="text/javascript"></script>
    <script src="/feeds/posts/summary?alt=json-in-script&amp;max-results=9999&amp;callback=loadtoc" type="text/javascript"></script>
    • After pasting the above code, you can write a title of your page. If you wish you can also disable comments because you would not like people posting comments on your sitemap. Once everything is done, press Publish button.
    We hope this article helped you learn how to add an HTML sitemap page in Blogger. If you enjoyed this article please share your thoughts in comments section below.

    Friday, September 23, 2016

    All Tech Buzz Responsive Blogger Template.


    Responsive Blogger Templates are rather used for media devices like mobile phones and tablets. Just because simple blogger templates are not compatible all screen sizes. We can also say that, the template or blog design is not visible properly on random devices. So to solve that issue we use responsive designs. By using responsive blogger template all scrolling system on small screen get fixed. Thus, other unwanted features can be hided. It will properly fit on our mobile or tablet screen. Therefore, we can read articles properly.
    Responsive designs are fit according to the screen or are therefore, adjustable according to the devices. Suppose if the user uses a smartphone and visit any website or blog. Then blog design will adjust according to the mobile screen. Approx 50% of blog visitors use smartphones/tablets. So if we don’t use responsive design on our blog then it will effect on Adsense earning due to low CTR (Click Through Rate). Sometimes it becomes difficult to find best responsive blogger templates because most of them are premium. Therefore, its not easy to find and choose free responsive blogger templates which works perfectly.
    Live Demo

    Download here


    Key Features:


    • Fully Responsive Blogger Template.
    • SEO Optimized and well coded.
    • Responsive 4 column stylish footer.
    • Sticky Post Feature.
    • Conditionally Loaded Social
    • Subscription buttons and scripts.


    Safe Tricks Responsive Blogger Template.


    Safe Tricks Responsive Blogger Template.


    Responsive Blogger Templates are rather used for media devices like mobile phones and tablets. Just because simple blogger templates are not compatible all screen sizes. We can also say that, the template or blog design is not visible properly on random devices. So to solve that issue we use responsive designs. By using responsive blogger template all scrolling system on small screen get fixed. Thus, other unwanted features can be hided. It will properly fit on our mobile or tablet screen. Therefore, we can read articles properly.
    Responsive designs are fit according to the screen or are therefore, adjustable according to the devices. Suppose if the user uses a smartphone and visit any website or blog. Then blog design will adjust according to the mobile screen. Approx 50% of blog visitors use smartphones/tablets. So if we don’t use responsive design on our blog then it will effect on Adsense earning due to low CTR (Click Through Rate). Sometimes it becomes difficult to find best responsive blogger templates because most of them are premium. Therefore, its not easy to find and choose free responsive blogger templates which works perfectly.

    Key Features: 

    • Neat and Clean and well coded Design and easy to customize from Template customizer. 
    • Fully Advance Responsive Blogger Template. 
    • Fully SEO optimized For Articles and Images.
    • Features Box Label Wise.
    • Inbuilt Widget.

    Download + Demo: 


    Demo
    Download

    Monday, September 19, 2016

    Embed PDF and other Documents In Blogger Blog Posts

    Embed PDF and other Documents In Blogger Blog Posts
    There are many ways through which we can embed PDFs or other documents like Microsoft Word, Spreadsheets, PowerPoint Slides, and Excel Spreadsheets into our Blogger Blog. However, Google Docs is probably the most authentic and reliable way of embedding the PDF documents in a website. Therefore, today in this article, we will show you How to Embed PDFs or any other documents in Blogger Blog Posts.

    First, go to https://drive.google.com  and Sign in into your Gmail or Google account so that you have the admin privilege to the documents that would upload from your system hard drive. 

    After signing in to your Google account, the next thing is to upload a PDF file from your system hard drive. On pressing the upload icon from the left side panel a drop down menu will pop out which would consist of two options i.e. File and Folder. Just select “File” and head to the next step.

    Now it will inquire you to select the PDF (document) that you want to embed on your website. Now press the open button and move to the next step.
    On pressing the open button a small upload wizard would appear on the right side of your screen. It usually takes a minute or two to upload, but it entirely depends upon the size of your file and the speed of your internet connection.

    Once uploading is finished, click on the file name and it will take you to a new page. Before, you can embed the document you have to change the permission of the file to the public. Thus, select the share button displaying at the top right corner of your screen and change the permission of the file from private to open.

    Press change, and select “public on the web” so anyone on the Internet can find and access. No sign-in required. Finally, press the Save button to conclude the wizard. For detailed instructions, check out the following screenshot.
    After changing the permission settings, now it’s time to grab the embed code. From the quick access tool bar select File >> Embed this PDF file. Now a new window will appear which would provide you the Embed code, copy the whole code and proceed to the next step.

    After copying the code go to Blogger.com >> Create a new Post >> Select HTML Tab, and paste the code where you would like to see the document to appear. Now within the code that you pasted few moments a go search for /preview and replace it with /edit?usp=sharing. Now publish your article, and that’s it. See the following screenshot.
    By default the width of the document is set to 640 pixels while the height is set to 480 pixels. You can reduce the width and height according to your needs. You should now see a PDF attached to your blog posts along with some significant options like download and etc.

    Friday, July 22, 2016

    Blogger Recent Comments Widget with Circle Avatar

    Blogger Recent Comments Widget with Circle Avatar

    Blogger Recent Comments Widget with Cirle Thumbnails - is a widget that can show recent comments. We add many widget for make our blog beautiful. All of them Recent Comments Widget is one. By this widget you can display a number of comment(s).

    In this time i share this widget. This widget is made with CSS and Javascript. By using this widget you also change the comment avatar size (Default size is 45px). This recent comment widget is fully different with other widget. This CSS look is awesome. Now let's start.

    Go to Blogger Dashboard > Layout > Add a gadget > HTML/Javascript and copy past the below code and save it.

    <style type="text/css" scoped> 
    ul.ms_recent{list-style:none;margin:0;padding:0;} 
    .ms_recent li{background:transparent;margin:0 0 6px!important;padding:3px  
    !important;display:block;clear:both;overflow:hidden;list-style:none; border: 1px solid transparent;
    border-radius:9px; max-height: 100px;} 
    .ms_recent li:hover{background:#fff;border: 1px solid #e9e9e9;}
    .ms_recent a {text-decoration:none;}
    .avatarImage{padding:3px;background:#fefefe;float:left;margin:0 6px 0 0;position:relative;overflow:hidden;} 
    .avatarRound{border-radius:100px;width:35px;height:35px} 
    .ms_recent li span{margin-top:4px;color: #444;display: block;font-size: 12px;line-height: 1.4;} 
    </style>
    <script type="text/javascript">
    //<![CDATA[
        var
     numComments  = 5,
     showAvatar  = true,
     avatarSize  = 35,
     roundAvatar = true,
     characters  = 40,
     defaultAvatar  = "http://www.gravatar.com/avatar/?d=mm",
     hideCredits = False;
     maxfeeds=50,
     adminBlog='MS';
    //]]>
    </script>
    <script type="text/javascript" src="https://cdn.rawgit.com/msdesign92/ms-design/master/recent2.js"></script>
    <script type="text/javascript" src="/feeds/comments/default?alt=json&amp;callback=ms_recent&amp;&amp;max-results=50">
    </script>

    Result:


    Thursday, July 21, 2016

    Add Automatically Title/Alt tag to Images in Blogger

    Add Automatically Title/Alt tag to Images in Blogger

    SEO optimization is very necessary for your blog. And you need to optimize all the elements of the site according to SEO. Image Alt tag is very important. Because google can't read the images, but google determines the type of image from its alt text. So, in order to get your image in Google Images search result you need to add the title and alt text to your images. So, here I am going to share another amazing blogger widget which will automatically adds the title and the alt text to all bogger images.


    Have Lots of Images?

    If you have lots of images, then it is very very time consuming and boring to add the alt and title text to each image one by one. To make this work easy I have designed a little plugin for blogger which will automatically adds the alt and title text to all images. Means you don't need to add the alt text manually. Just upload the images and you are done. The work of adding title and alt tag to images will done this plugin.

     Also if you have some old post images which are also missing the title and alt tag, then you don't need to add alt tag to images manually, this script will automatically adds the title and alt tags to all images of your blogger site. Great na!!

    How to Add Automatically Title/Alt tag to Images in Blogger

    Want to install this widget? if yes then follow the below simple steps:

    Goto Blogger Dashboard
    Goto Template Tab
    Click on Edit HTML
    Now search for the </body> tag
    Now paste the below code just above the </body> tag.
    <script src='https://ajax.googleapis.com/ajax/libs/jquery/1.8.3/jquery.min.js' type='text/javascript'/> 
    <script type='text/javascript'> 
     //<![CDATA[ 
     $(document).ready(function() { 
      $('img').each(function(){ 
       var $img = $(this); 
       var filename = $img.attr('src') 
       $img.attr('title', filename.substring((filename.lastIndexOf('/'))+1, filename.lastIndexOf('.'))); 
       $img.attr('alt', filename.substring((filename.lastIndexOf('/'))+1, filename.lastIndexOf('.'))); 
      }); 
     }); 
     //]]> 
     </script>
    Now click on Save Template.
    That's it you have successfully installed the widget

    Customization

    Most of the blogger templates have already add the Jquery Library. So, if the jquery library is already presents in your blogger template then just remove the highlighted code line from the code. But if the jquery library is not present in your template then don't remove the highlighted text, otherwise the widget don't work.

    How This Widget Work


    If you are curious about the widget that how it works? How it adds the title and alt text to images and from where it gets the title and alt text? Then here I am going to explain it. This widget gets the name of the image which you have entered to image before uploading and adds that name as a title and alt text of the image.
    Note: So, keep in mind that before uploading the images don't forget to properly rename the image files according to your post topic, so that you get the right alt text to your images.

    Final Words


    Hope guys that this widget might helps you in optimizing your blogger site. In my case, this widget helps me a lot. At first I designed this widget for my images site where I upload different types of images like wallpapers, gifs, comics etc. But after I see the benefits of this widget I decided to share it with you guys. Let me know if you have anything to say in below comment box.

    Don't forget to share this post, and Stay blessed, Stay Smiling and Happy SEO and Blogging. :)

    Tuesday, July 12, 2016

    Flat News – Easy News & Magazine Blogger Template


    Download Free Flat News Blogger Template v.2.6.5 – ThemeForest | Flat News – Easy News & Magazine Template v2.6.5 is a Responsive News and Magazine Blogspot Theme having great user friendly features and premium qualities. It is build using light weight coding that does not harm your SEO ranking on Search Engine Result Pages (SERPs), it will surely help your site to boost ranking on Search Engine Pages because is fully optimized for Meta Description, Titles for Pages and Posts, Meta Keywords etc. This web theme is very easy to work and easy to customize by everyone without having coding knowledge, just install and use it just like as 1,2,3. FlatNews v2.6.5 is 100% responsive that support many electronic and digital devices such as Android Phones and Tablets and other computer computer screen resolutions. It has also drag-drop option to build your own home design with ease.

    Price: 21$

    Demo:http://adf.ly/1cApuD


    Download free:


    50+ Premium Blogger Templates Free Download 2016


    Hello and welcome to Brainfy.
    Everyone wanted to have a perfect blog.
    A blog is said to be perfect if it have quality content with a beautiful design.
    Today I am going to share 50 premium themes for https://blogger.com
    As we have already post about blogger template so before you download 50 premium templates you should read this:

    How to change blogger template

    If you are familiar with that !
    Then you should scroll down to this topic.

    50+ Premium Blogger Templates Free Download 2016

    Download Free Premium Blogger Templates 2016 Pack including 50+ Professional Blogspot Themes 2016 by ThemeForest and other developers. In this post we have together all premium responsive blogger template(s) having great user friendly functionality in it. You all will surely like this theme package only for Blogspot users. This package includes the most awesome web designs in the world developed by great developers and designers. As you know blogger.com is an amazing and most useful web publishing platform in the world having millions of webmaster / bloggers. It is perfect solution for newbies who do not know how to start a blog and how to get money from it. So you can start your journey through blogspoblogspot.

    Adamz Responsive Blogger Template
    ActiveMag Blogger Template
    Agista Blogger Template
    AJBSpot Blogspot Theme
    Avoid Blogspot Template
    and More…

    Download Links:


    Final words: 

    If you are searching for premium  blogger template then your search is over you can have one.
    This is the pack of 50 premium template template for free.

    Wednesday, July 6, 2016

    How to Make Money with Blogspot Blog

    How to Make Money with Blogspot Blog?

    Ofcourse Everyone need money to fulfil there wants and Nowadays it is pretty hard to make money. So today I am going to explain how can one make money with a blogspot free blog without investment savvy!

    As I was away fro net so  I stopped to share post and now I am back so tell me didn't you read my previous post?


    My previous post was helpful for those who used to upload files in there websites.

    So now we are coming back to our topic which is How to make money with blogspot blog? Sounds like a question? Well is it possible to make money with blogspot blog I meant meant a free blog? And the answer  is YES you can make money with blogspot blogger's blog. There are many ways to make money with your blog. For example You can sell your products with blog. You can promote something to sell for other and get your half or you can display ads in your blog and get paid for it. But before you started that you will need audience to see your blog. 
    If you are new and you haven't touched blog read some of the beginning tips:


    Now you have to make your blog famous for which you have to the following steps: 

    1. Add your blog in Search engines:

    To get audience for your blog you need to add your blog in search engines like google bing etc so it will be searched in these engines and you will get your traffic. Is there is any problem adding blog in search engines? Read full article: 


    2. Make your blog users friendly:

    Making blog users friendly SEO is a good way to rank up your blog in these search engines as in past I have briefly explained a topic related to blogspot SEO.

    Read Now:


    After that we are going to talk about the question how to make money with blogspot blog?

    Making money with blog is not easy In start but it can be comfortable and enjoyable way to make money. What make it possible to make money with blogger's blog? Is AdSense. 
    Now what is AdSense? Didn't you ever heard of AdSense?
    AdSense is ads company lunched by google you can read it's history in google and Wikipedia too. AdSense offers ads to display in your blog and sites for which they will paid you.


    Sounds good? Yeea many peoples from around the world use AdSense for making money from there blogger's blog.  There are many posts related to AdSense in my blog you can read and knowledge about AdSense so stop wasting time on net and start earning from net. 

    Read articles related to AdSense:


    AdSense: 

    AdSense (Google AdSense) is an advertising placement service by Google. The program is designed for website publishers who want to display targeted text, video or image advertisements on website pages and earn money when site visitors view or click the ads.

    AdSense and Blogger:

    AdSense and blogger can be used together to make money from your blog content since these both are Google's companies so they can be used together you can directly sign up for AdSense through blogger. 

    Steps to sign up AdSense with your blogblogger's blog:

    1. Sign in to your blogger's blog at:  blogger.com
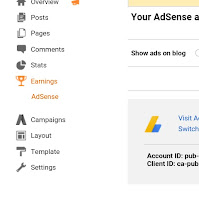
    2. Go to Earning>AdSense
    3. Sign up with your gmail 

    You can see where to sign up in below screen shot too.

    Brainfy: AdSense in blogspot
    AdSense in blogspot

    Note:

    Google AdSense doesn't sign up or approved everyone so you have to make your blog capable to it's policy and you will get approved. For AdSense approval you need to have more traffic with more contents. Read now AdSense terms and conditions which vary from country to country.