Showing posts with label PHP. Show all posts

Thursday, July 7, 2016

How to install Php in android mobiles or tablets

Installing Php in android: 

Hello welcome back to brainfy blog in this post I am going to tell you how to install php in android devices. But before we processed to this post let me know didn't you read my previous post?

Read now:

HOW  TO MAKE MONEY WITH BLOGSPOT BLOG

Now before we install php in android let us know some about php. What is php? And what is the purpose to use php?

What is PHP: 

PHP: Hypertext Preprocessor) is a widely-used open source general-purpose scripting language that is especially suited for web development and can be embedded into HTML.

Purpose to use PHP:

As HTML is use for designing but PHP is used to make that designs  working. You can make make a login form in HTML but you can make it working through PHP.

PHP installation in android:

Android is now available all our the world in smart phones ad tablets. As programmer can't take there computers with them to manage and code there programs so now they can manage there php files in android phones and tablets which could be very useful for them.

PHP installation:

Now let us began to install php in our android.  So first you need to download a application from google play which icalled php runner which can be used as a php runner. 
Go to google play and search php runner and download the first one or you can download it directly from this link: PHP runner
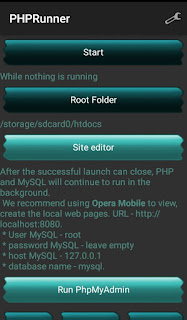
Install PHP Runner and open it. It will look like :
Brainfy PHPRunner
PHPRunner
PHPRunner for android
PHPRunner
So you can see there are many options in PHP Runner. Start is used to run your local php runner. Site editor is used to see your php files you have add or code in it. Root folder is the place where you have to place your index.php files. Run and install myadmin to manage your databases. 
If you didn't get that? Well I have a video for you:

Installing PHP Runner Video:


Thursday, June 23, 2016

How to Setup Freenom .tk .cf Domain to 000Webhost.com

How to setup .tk domain to 000webhost.com:

Welcome back to Brainfy blog I am here with a new topic today did you read my previous post? 

Previous post: 

Now today we are going to setup a custom domain to 000webhost.com. 
First we need to login or register to 000webhost.com and chose a domain name they are give. I meant chose a sub domain for your account. It is only for little time. Now don't close this tab and open other tab  and go to https://freenom.com and login or register you domain with .tk .cf what do you want. Now go to manage your domains in freenom. Leave this tab for now and open 000webhost again.

Now view your account information in 000webhost.com
How to Setup Freenom .tk .cf Domain to 000Webhost.com
It will look like thatthat now we have to take domain information from that and fill in freenom.com
As you can see my records 

ns01.000webhost.com  

31.170.167.6


ns02.000webhost.com

31.170.164.248


Now we are going to fill this in freenom domain.

Now go back to freenom tab. 
Now click Register glue records
How to Setup Freenom .tk .cf Domain to 000Webhost.com
And glue records will be open like below in screen shoot:
Now you can see that there are three places in glue records

  1. Register
  2. Modify
  3. Delete
So you can register modify and delete glue records from here.


freenom glue records
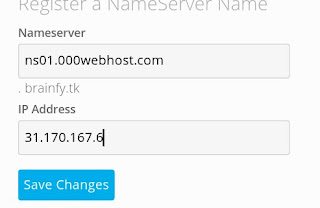
Now take the first record.
ns01.000webhost.com
31.170.167.6

And fill it in register like below in picture.


register a glue record
Now take the second record and fill it again in register. See below picture.


register a glue record

So we have done this now go to 000webhost.com and create another account with a custom domain and give your domains with glue records you have register earlier. 

You can check my domain for 000webhost.com

DEMO: https://brainfyforum.tk


Wednesday, June 22, 2016

How to install WordPress in 000webhost.com

WordPress is popular blog maker nowdays and it is very powerful to use and safe. So we are going to discuss how to install WordPress in your own hosting. So here we go:


 Step 1: 

Download WordPress From https://wordpress.org and extract it into a folder on your desktop.

Step 2:

 and sign up for an account. When you have signed up, using your personal details, you’ll see a page where the titel will say ‘List of your domains‘. Choose your domain, and press ‘Go to CPanel‘.

Step 3:

When you’re at your CPanel, scroll down until you see a Titel that says ‘>> Files‘. Under that select ‘File Manager‘. Now a login screen appears. Just leave the username, and in the password type the password you used when you signed up. Then you should get into your FTP Server. Here you checkmark the ‘Public_HTML‘ folder, and press ‘Delete‘. Then you go to your desktop and open the WordPress archive, and inside it you name the WordPress folder ‘Public_HTML‘. When you’re done doing that, you go back to your ftp server, and press ‘Upload‘. Now you’ll see a page with 2 coloums. The first one is for normal files, and the second one is for archives. Press ‘Browse‘ or ‘Choose File‘ at the second coloum. Now browse to your desktop, and choose the WordPress archive. Then click the big green checkmark. Now you should see a page where it says that it was succesfully extracted and placen. Now click the big green checkmark again, and then the blue arrow.

Step 4:

Now go back to your CPanel, and find a Titel that says ‘>> Software / Services‘ and choose ‘MySQL‘. Here you need to create a new database. In ‘MySQL database name:‘ you can type whatever you want your database to be called. In this tutorial we will be using ‘Test123‘. In the next one called ‘MySQL user name:‘ you’ll type the same as in database name, so we type in ‘Test123‘. Then you’ll need to type in a password. It needs to contain both numbers and letters. When you’re done doing that, you press ‘Create Database‘. A page where all the information you just typed in, will stand. DO NOT CLOSE THIS!.

Step 5:

Open a new tab, or window, and browse to your website/domain. A WordPress page should show if you’re done everything in Step 3 correctly. Here it will say that you need to make a configuration file, or something. Press the button. Now you’ll need to fill in the information from your MySQL database. Just go back to the other tab/window, and copy the information. Just leave ‘Table Prefix‘ as it is. Then press ‘Submit‘, and it should browse to your Admin Panel! Then you could simply open a new tab and go to your website again to see how it looks.

Congratulations you have installed WordPress in 000host.com 


Things needed for this topic:
  1. wordpress.org
  2. www.000webhost.com
Or you can use other free php supported platforms:

Tuesday, June 21, 2016

Make a blog with Nibble Blog System with own Hostings

Today I am going to show you a simple method to create your own blog with your own hoating.

What is Nibble Blog System?

Nibble is a open source blog code which can be host at any php supported platform. 
All you need to do is to copy the code and paste in host but isn't simple copy paste. 

Download Nibble Blog Code:

From below link you can download latest version of Nibble Blog. 
After completion of download extract it into to a folder

Now we are going to sign up for free hosting. 

Use one of the free hosting and upload your blog code to root Directory. 

Now go to your blog link and it will look like:

Nibble Blog installation
Now fill the above information with your personal data. And complete installation.

Admin login will look like:


admin
And blog post will look like:


blog views

It will be clean and without ads and you can setup your own ads in it.

Nibble DEMO: https://brainfyblog.tk


If like this post share it on social media click one of below showing social media network.

If had any problem related this comment now. I will be happy to answer them.


Web hosting

Monday, June 20, 2016

Make A Forum with Simple Machines Ads free

Simple machine Forum:

Hello friends today we are going to make a SMF forum using own hosting with sub domain but you can use your own domain too if you want to.

What is SMF?

 SMF is all that in one package, giving you an easy to use forum with many powerful features for you as well as your users. SMF is an open-source project made by volunteers from across the world.

Easily Customizable

 SMF features a powerful Package Manager, allowing you to quickly apply any of the hundreds of modifications in our database, as well as a variety of custom themes that change the way your site looks.

These were some of the features of SMF now we are going to make a simple forum without ads. 

First we need to download SMF
Once download complete open it and extract it into a new folder. 

Now we need free hosting to host SMF Forum. As previous days I have mentioned some of the free hosting: 


We are going to use one of them and we can use the first one.
000webhost.com 


After confirmation you need to upload all the SMF files to your webhost. Remember you can upload though your browser or using FTP uploaded. 

Finished upload? Now you need to install SML open url of your hosting complete installation and your forum is ready. 

For DEMO Check out https://brainfy.comli.com

If you like DEMO try this forum other wise leave it.
If you didn't get it? Watch video:


Related posts:

Monday, June 13, 2016

Free php hosting with mysql

Welcome back I am here with a list of free php hosting with mysql support. Have you read my previous post? Didn't ya? Read now it might be helpful to you:

Do you want to remove bloggers and WordPress or other credits from your website and blogs? Do you want to make your own blog and forum with no ads. Here is something that will help you to make a ads free and fully yours blog and forum.
So now today I am going to discuss what is php? What is mysql? And what are free hosting that support php. And A list of free php hosting. You can build a forum blog and a full website using php.

What is php?

PHP: 

Hypertext Preprocessor) is a widely-used open source general-purpose scripting language that is especially suited for web development and can be embedded into HTML.
Php is not supporting in every hosting it need to run it. Install EditRocket to run php in PC.

What is mysql?

MySQL, the most popular Open Source SQL database management system, is developed, distributed, and supported by Oracle Corporation. The MySQL Web site (http://www.mysql.com) provides the latest information about MySQL software. MySQL is a database management system. A database is a structured collection of data.
There are different ways to upload your php file you can use your web browser or upload files through ftp connection. Download filezilla for android use AndFtp.
Here is list of free php hosting:

1. www.000webhost.com


offer completely ad-free cPanel web hosting. No ads will ever be forced onto our users webpages. There are no catches, no setup fees, no forced advertising, no banners, no popups and no hidden charges. Only totally free hosting service.

Register now, here is what waiting for you:
* 1500 MB Disk Space
* 100 GB Data Transfer
* cPanel Control Panel
* Website Builder
* 5 MySQL Databases
* Unrestricted PHP5 support
* Instant Setup!

Sign to 000webhost.com

2. Hostinger.in ( free for life time)

A free Php hosting from Indian company. It is free for life time without ads with my discount offers. It is free for life time so you can try it.

3. www.awardspace.com

FREE WEB HOSTING
$000 /mo
1 GB Disk Space
5 GB Traffic
1 Domain Hosting
3 Subdomains
1 MySQL(v.5) Database
100% NO ADS
PHP5 , Perl/CGI-BIN , FTP
Joom4. byet.hostla & Wordpress Installer
1 Email(IMAP, POP3), Webmail
Email Sending (SMTP ON)

4. byet.host/free-hosting

Byet gives you the choice of your sub domain. You can stick with yoursite.byethost.com, or you can pick from another 7 great names we have available. With MySQL, PHP, FTP, VistaPanel (our specially designed control panel) and other features, you can host heaps of scripts with no worries. Adding your own domain registered at any domain registrar is just a few clicks and is hosted on your free Byet account!
Features:
- fast hosting on multi CPU servers with 32/64 GB of RAM
- your account will never expire, but your site must have at least 1 visit each month;
- free web space - up to 1500MB with 12 MB file size limit; almost ALL files allowed for upload; no limit for number of files/inodes;
- unmetered traffic;
- daily/weekly backups on external source - peace of mind as your files will not be lost in case of server crash;
- no ads for small sites;
Conclusion:
PHP is a programming language which can't be run with its hosting these were some of free and popular websites for php hosting. Do you know other hosting for php Comment it now.